By reading, downloading or printing this online tech note, you agree to pay
the posted licensing fee in accordance with our payment terms and licensing
agreement. To keep our prices as low as possible, please note that we DO NOT
mail hardcopies. For additional information on our satisfaction guarantee
including terms and conditions, please click HERE.
Thank you for your patronage. Our authors are very grateful for your support of
Builders Websource®.
Abstract
Rain, melting snow, runoff and condensation are destructive
natural forces that can result in significant damage to residential
foundations and basements. Since these forces often occur invisibly
underground, water infiltration presents one of the most elusive and least
understood problems for homeowners. Along the way, this leads to great
frustration and expense as homeowners seek ways to prevent water from
penetrating everything from roofs to slabs to cellar floors. This Builders
Websource technical brief outlines the causes for foundation water
infiltration and presents several techniques for preventing and eliminating
such conditions in new and existing dwellings.
Special Notes
This technical brief has been adapted, edited and revised with permission from Russell H. Lanoie, Rural Home Technology. Important Notice! Homeowners or contractors
with severe drainage conditions should always consult a specialist to engineer remedies optimized for the particular "on-site" conditions.
Many
"how-to" magazines run articles touting miracle products that stop water
from permeating through foundations or basement walls and floors. While some
products may be effective at mitigating water migration through cracks or
flaws in a wall, blocking groundwater can be as tough as keeping water from
leaking through split seams of a wooden boat. So long as any part of the
boat is in the water, a certain amount of water is bound to find its way
inside. Never wait until water enters the basement or permeates the
foundation before treating the root cause. The resulting dampness is both
distasteful and potentially dangerous, even if there is no noticeable
standing water.
There are four ways that moisture can permeate foundations
or enter and collect in basements:
High groundwater table
Surface (rain) water leaking through openings or flaws in the walls
Condensation
Broken plumbing and/or irrigation runoff
High Groundwater Table
Wet basements are a very common problem, particularly in
low-lying areas or mountains where high water tables are common. This means
that the ground water level has risen up to its high point for the year due
to melting snow, spring rains, lack of water pickup by the trees and plants,
and the absence of sun to dry the ground during the winter. Some soils such
as clay bind water tightly, keeping the water table high for extended
periods. Porous soils including sands and gravels pass water quickly, yet
often have high springtime water tables, especially in low areas due to
excess springtime runoff.
Unfortunately, many homes are built with
inadequate protection from groundwater, even though site conditions may be
well suited for the proper installation of a simple and cost-effective
drainage system. Once a water problem is discovered after a house is built,
it is very difficult and expensive to remedy. If left unchecked, structural
and health-related problems may persist. Excessive moisture not only results
in a musty smell or damage to carpet and wood flooring materials, but it
promotes growth of mold spores, which can result in asthmatic symptoms in
many people. For this reason, the use of vapor barriers under slabs as well
as other drainage techniques are essential to keeping your home dry
year-round.
To help illustrate the high groundwater problem, imagine a 12"-high pile
of sand in the middle of your bathtub -- with six inches of water in the tub
around it. If you were to dig a six-inch-deep hole in the sand, you would
find water at the bottom of the hole. By adding more water to the tub, the
water level in the hole would rise as the surrounding water reached
equilibrium due to hydrostatic pressure. This simulates the effect of a
higher water table acting on a foundation. Now, inserting a watertight box
into the hole would cause it to float. If there were holes in the box, water
would seep inside. In this analogy, the box is the basement or foundation,
and the tub water is groundwater.
Wrong Culprit
Years ago I did a job for a homeowner who insisted that her basement
became wet only after a rainstorm. After lots of digging and waterproofing,
(and continued water in the basement) I was left with a serious question
about the real source of the water. Finally I started checking the house
plumbing and discovered a leak in the water heater! I've learned to more be
suspicious.
Keeping Water Out
Ironically, making residential basements absolutely
watertight can lead to other problems if not properly engineered. For
example, basements of many commercial buildings in highly developed areas
are built watertight. However, their construction costs are extremely high
compared to typical residential basements because their foundations and
floor systems are built to far more stringent specifications. This is not
only to keep water out, but to keep the high pressure of outside water from
causing structural damage. Consider this real-life situation that occurred a
few years ago:
During one extremely rainy night, a family awakened to a
strange sound coming from their basement. Apparently, excess rainwater had
saturated the ground around their home given its location in the lowest
section of their development. The extreme pressure from the accumulated
ground water actually buckled up the basement floor, causing the soil from
under the floor to erupt six feet, covering their washer and dryer. The
sudden soil displacement undermined the overall foundation, causing one of
the walls to fall over a foot. The house was abandoned for massive
structural repairs.
Although this is an extreme example, it demonstrates the powerfully
destructive force of water. This foundation was built in a manner similar to
many residential basements. Yet, by allowing the groundwater pressure to
rise without relief, failure resulted in the weakest part of the structure
which, in this case, happened to be the concrete floor.
Ironically, if homes were absolutely watertight, they might even float
like the box in the bathtub, resulting in an unstable structure. However,
many homes have sump pumps to discharge out any water that might leak in
which could otherwise damage the basement. Fortunately, as water is pumped
out of the basement, the water table around the house is lowered, (like
pulling the plug on the bathtub drain) relieving the "hydrostatic" pressure.
This is why floating houses or erupting floors are rare.
One effective way to check the water table near a house which has a dug
well is to uncover the well and measure the depth from the ground surface
down to the water. Compare this depth to that of the basement floor below
grade and the difference equals the depth to which the basement would flood
if the water were not removed. Even if the house is located on sloping
terrain, the water table remains approximately the same distance down from
place to place as groundwater tends to follow the contour of the surface.
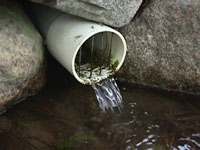
Perimeter Drains
In many situations, particularly in mountainous regions
where the land is seldom flat, it is possible to drain water away from most
foundations and basements by gravity rather than by pumping. The traditional
method specifies a perimeter drain around the outside of a building during
its construction. The drain outlet slopes downhill away from the house until
it reaches the surface of the ground where it can freely discharge by
gravity flow. The advantage of this method over pumping water out of a sump
is that it lowers the water table around the house, preventing water from
ever reaching the cellar in the first place.
In many instances where
experts have been asked to troubleshoot wet basement problems,
a common finding is drain pipes that were installed above the foundation
footing, which allows water to rise to the level of the floor (Figure A,
level Y).
If the builder made the additional mistake of installing the drain pipe
with the weep holes facing up, then the level of water has to rise to the
top of the pipe (level X) before the pipe can pick up any water. Other times
there is little or no porous bedding material and pipe inlet holes can
become plugged. Another problem occurs with large bedding stone. Migration
of the original soil into the bedding plugs up the stone, leading to
failure. Often a combination of problems may coexist.
Conventional
perimeter drains are usually constructed as shown in Figure B with 4" pipe
laid at the base of the footing. Most contractors use 1 1/2" crushed stone
around the outside of PVC or thinwall perforated septic system pipe which
has 1/2" or 5/8" holes every few inches. Usually this is entirely
satisfactory, though in some cases capillary action (wicking) within the
soil can make the basement floor damp even though it is a few inches above
the artificially lowered water table.
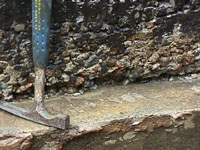
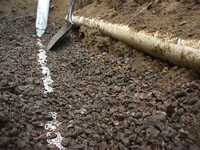
Due to the severe conditions encountered when building a home several
years ago, the following example illustrates an improved method. Just as
sitework
started, the property was deluged with rain. The rain aggravated an already
difficult groundwater situation, threatening postponement of construction.
However, with patience (and a good pair of rubber boots), perimeter drains
were installed four feet outside of where the house was to be located.
Within days of installing the drains, excavation for the basement was able
to proceed as if it were a dry summer.
The home is built into the ground about six feet deep on a gently sloping
hill. Several years have since passed and the home has never been bothered
by moisture in the basement. This is in spite of the original springtime
water table just two feet below the surface of the ground. Figure C shows
how the drains were installed. This same procedure is excellent for drying
out existing wet basements where conditions permit.
Ensuring Effective Drainage
The first consideration is setting the drain pipe deep
enough to lower the water table well below the floor in order to reduce the
effects of capillary action (wicking). Another way to reduce this effect --
generally limited to new construction -- is to install a layer of crushed
stone entirely under the basement floor. Water cannot "wick" through this
coarse aggregate. Although this is more costly, it is good insurance for a
dry basement.
Alternatively, installing the drain pipe a little lower may
be a very cost-effective alternative, assuming there is sufficient side hill
grade to ensure gravity discharge well away from the structure. For new
construction and retrofit situations, place the drain pipe a foot or more
lower than the footing whenever possible and far enough away to avoid
undermining the foundation. Generally 2' to 4' or even more is
necessary to protect landscaping or porches and similar structures.
In retrofit situations, installing a drain on the upgrade side of the house
can yield a significant improvement, as it is usually only necessary to
intercept water moving through the ground toward the house to eliminate the
moisture problem. This type of drain is considered a "curtain drain" rather
than a footing or perimeter drain, especially if it is several feet from the
house. Its job is to lower the water table downgrade in order to protect the
house. The curtain drain method is an important consideration particularly
for retrofit installations as it can reduce site disruption and the
resulting cost of excavation.
Obstructions
At times it is impossible to place a pipe at or below the bottom of a
footing due to immovable obstructions such as boulders or a rock ledge. At
times these may actually be cast into the footing. In this case, it is a
good idea to pressure wash the rock surface and grout (seal) the rock to the
wall with a strong, well bonding masonry product. This masonry seal keeps
water from entering under the footing, and is formed into a shape that
gradually slopes away to divert water from the rock or ledge to a point
where it can be picked up by a conventional perimeter drain system. This
technique requires patience and a little luck to be entirely successful, but
it is often easier than trenching through solid granite!
The pipe around the house can be laid level and needs only the slightest
pitch to vent successfully, unlike a sewer line which is designed to carry
floating solids. 1/16" to 1/8" per foot is more than enough pitch, though
steeper is perfectly acceptable. Use perforated or slotted pipe only in the
area that needs to be kept dry, especially if the outlet pipe runs near a
septic system (see local codes) or there are trees anywhere near its path.
An
inexpensive tool ideal for ensuring the proper slope is the
WatrLevel, now available to
homeowners and contractors through Builders Websource. The WatrLevel
simplifies the process of setting pipe invert elevations, including around
corners -- which is typical in most residential situations.
Water flowing through a pipe toward the ground surface provides an
invitation for tree roots which can enter and eventually block it
completely. It is best to use solid pipe with root proof joints to prevent
root penetration whenever possible. Schedule 40 pipe (the heavy stuff)
should be used wherever there is a possibility of any type of vehicle
hitting or crushing it. The outlet should be placed high enough in the
outlet ditch or sidehill to let water freefall several inches to keep small
amounts of buildup from blocking the pipe. It is helpful to make a header of
stone around the outlet for protection.
The outlet must be located in accordance with regulations regarding
distances from septic systems and the neighbor's lot lines. The end of the
pipe should have a rodent guard to keep critters from nesting during the dry
season in this ready-made hotel. Use 4 pieces of brass wire (which doesn't
rust or corrode) spaced about ¾" apart to discourage the critters. Anything
finer can plug up with algae and silt that might occasionally wash through
the line.
Whenever possible, install a tee or an elbow on the drain line at the
origin of the pipe (the opposite end from the outlet) and extend a riser
pipe to the surface of the ground next to the house. This riser serves as
both an inspection point and an emergency cleanout if ever necessary. Cover
the cleanout with a 4" plastic screw-on cap and clearly mark the location.
Often it is possible to make the cap flush with the surface of the crushed
stone that is used as a splash guard around the foundation, leaving it
nearly invisible but easily accessible. It is helpful to make diagrams or
take photos to record all such locations. In many cases it is also helpful
to place a tall stake next to the outlet (particularly in snow country) in
the event it may need to be checked during winter.
Where the drain makes a turn to conform to the foundation (such as a 90"
corner), use a gentle sweep as opposed to a sharp 90" connector. The sweep
helps to eliminate clogging and simplifies use of a plumbing snake in the
event of failure. In addition, periodic cleanouts should be installed after
every few 90" turns.
Bedding Material
To prohibit 1½" stone from silting up, the stone should be wrapped in
filter fabric to hold back the original soil. Water still passes through the
fabric but the soil stays in place. Better yet, use a different bedding
material that readily passes water but is considerably less expensive.
Washed concrete sand, the coarser the better, allows water to flow through
readily but keeps the trench more stable than stone while reducing silt
buildup in the system. I've used it for 25 years in all but the wettest
conditions (where I occasionally use ¾" stone wrapped in fabric) with
outstanding results and no call backs. This technique requires using pipe
with smaller holes since the half inch or larger holes in standard
perforated pipe will not hold sand out.
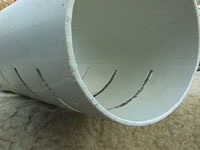
Since no one makes pipe with 5/16" holes like they used to 25 years ago,
you can produce your own slotted pipe by setting a radial arm saw about 3"
above the table and slicing through ¼ the depth of solid pipe every two to
three inches or so. Wear goggles to prevent flying chips of hot plastic from
striking your eyes. Use either rigid polyethylene or good quality PVC pipe
that resists shattering when the saw blade passes through. The 1/8" slots
that result seem to let in water just fine and yet keep the concrete sand
from entering the pipe. Pipe is installed with the slots facing down or
turned slightly toward the direction of incoming water.
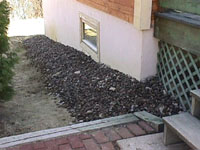
Backfill
Proper backfilling is important to keep moisture away from the foundation
wall. Using clean, porous sandy backfill against the wall will keep water
from lingering and finding its way through imperfections. To conserve the
amount of sandy material that may need to be brought on site it is possible
to add sand directly against the wall and original material (with the large
rocks removed) towards the outside of the excavation using alternating
buckets of backfill (and compacting these layers) as the excavation hole is
filled. The backfill should be topped off with nonporous material (clay or
loam) and sloped away from the foundation to prevent surface water from
entering the ground next to the wall.
If the drain pipe cannot be run to a safe outlet area, it may be possible
to run the outlet to a dry well on the property that is downhill from the
house but high enough above the water table to "relocate" the water on site
without it ever being brought to the surface. If this is not possible, it
may be necessary to connect the perimeter drains to a collection basin
outside of the house. From there, a sump pump can lift and discharge water
away from the house. It is helpful to find a place to send the water that is
far enough away so that it does not recirculate through the ground into the
basement.
A note on why I don't use the readily available 4" rolled black pipe:
Our local NRCS soil conservation technician recommends against using the
stuff in our area because of the amount of iron in our water which
stimulates an "iron bacteria" (also often seen in wells) that can plug up
the narrower slots. This is why I prefer to slot my own pipe, and also
because it is easier to maintain grade during installation using a rigid
pipe.
Sump Pumps
Of course, the disadvantage of using a pump is that the
dewatering process is entirely dependent on the reliability of the pump and
the supply of electricity.
I can remember receiving letters from home
years ago telling of the recurring disasters to my aunt's house caused by
excess water in her basement when her sump pump failed. Freezers full of
spoiled food, ruined furniture and the general nuisance of a flooded
basement were becoming too much to bear. On one trip home I did some
checking and told the folks that a gravity drain could probably solve the
problem.
They went ahead and had one installed and have had no more trouble with
unexpected flooding or pump maintenance since. What is surprising is that it
took a college education and several years in the construction field before
I was able to make such a simple and obvious recommendation. Yet I know of
similar situations that exist today, and houses that are being built where
sump pumps are expected to do what could have been done with a few pieces of
pipe and some planning.
Many basement drainage companies still rely on sump pumps for all
installations, regardless of whether or not gravity could be used to
discharge the water. This creates a long-term dependence on a mechanical
device.
Sump pumps can get plugged up, wear out, fail to come on after months of
non-use, or stop because of a power failure. Unfortunately, it is often
during the worst weather conditions when power is lost in rural areas while,
at the same time, excessive rainfall is causing the water table to rise.
About the only assured way to protect a basement is to install a redundant
pump and a separate circuit coupled with a battery-powered back-up system
that automatically kicks in when all else fails. Such systems are now on the
market but represent additional investment and occasional maintenance to
keep them in working order. They use an automotive-type battery for power,
similar to safety lights in public buildings.
If there is no choice but to install a sump pump, selecting the right
pump should be based on the severity of the situation. There are many types
market, but the extra money spent for a high quality submersible style with
a built-in switch is well worthwhile, especially in extreme situations.
Excessive dampness can quickly corrode unprotected motors on pedestal pumps
and a power failure that allows water to completely cover an unprotected
motor can require replacement of the entire pump. Also, there are automatic
switches now available that allow sump pumps to draw water down to within a
fraction of an inch of the floor and to turn on when water is only slightly
deeper. This can be helpful for occasionally dewatering a basement without
digging a sump hole through the concrete floor.
Filter Fabric: Synthetic cloth-like material that is used for several
different types of construction related applications such as erosion
control, road stabilization and soil separation. Can consist of either woven
or non-woven fibers in varying thicknesses or weights. Available in 12 to 15
foot wide rolls several hundred feet in length. Woven fabrics (usually
black) resemble the stuff that modern day grain bags and weed control fabric
are made from while non-woven fabrics can resemble a range of materials from
soft felts to the stiff shiny house wrap (to which they are closely related)
usually seen enveloping homes under construction.
Maintenance
It is essential to keep the drain outlet running freely. The
rodent guard must be kept clear of any debris. The area below the
outlet must be kept cleared of leaves and debris, especially if the drain
empties into a ditch.
Sometimes drains that have clogged up internally can
be cleared by the use of a pressure washer (or even a garden hose) to break
up the clog. I've cleared obstructions from perimeter drains and had water
drain out of the basement just like water leaving a bathtub.
Properly installed perimeter drains create an "island" out of the house
site by lowering the water table completely around the house. They keep
water from entering under the footings and, in my experience, provide the
surest protection against any type of dampness in a basement resulting from
groundwater.
There are some situations where perimeter drains are not necessary,
however. A thorough knowledge of the site, or an exceptionally low water
table indication from a septic system test pit, can provide such a
determination.
If you happen to be one of those folks already blessed with an unwanted
indoor swimming pool each Spring, whether in a new or existing house, rest
assured that there usually is something that can be done. However, since
soil conditions vary so greatly, it is wise to consider your circumstances
carefully before deciding on a course of action.
Filter material: According to the American Iron and Steel Institute's
Handbook of steel drainage and Highway Construction Products, 1967:
"Early subdrains consisted of a trench filled with coarse rock ("french"
drains) which quickly silted up. Extensive research by the U.S.Waterways
Experiment Station at Vicksburg, Mississippi, shows that a graded material
roughly equal to concrete sand (AASHO Specs) has been found most suitable.
Such material gives better support to the sidewall of the trench and thereby
reduces erosion and silting. Filter material should be placed in layers and
tamped."
Leaks in Foundation Walls
Another condition that can sometimes appear to be high
ground water leaking
in may simply be surface water entering over or through the foundation at
bulkheads or window openings, seams between walls, and/or, flaws in the
foundation. Poor surface grading can direct water toward the lip of a
bulkhead or towards basement windows where it can spill over into the
basement. By not paying attention during heavy rains, a homeowner can
sometimes end up blaming the wrong culprit.
Surface water leakage
Surface water leakage is reasonably easy to locate once you get on track.
The solution often involves regrading to drain water away from the
foundation. In the case of foundation windows, however, it is not always
possible to shed water away since the bottom of the windows are often too
far below the adjacent ground, requiring the installation of window wells.
These often consist of corrugated galvanized steel half circles but can also
be made of pressure treated wood or masonry. The goal is to make the top of
the window well high enough to be able to slope the surrounding ground
surface away from the house. A problem arises when the window well is
directly below the roof drip, especially in cold, wet climates where rain
gutters are seldom used (because snow and ice fills them, making them
useless, or ripping them from the building!)
The solution is either to cover the window well with a clear plastic dome
which also keeps out leaves and critters or to create a mini-drywell under
the window well to allow rainwater to soak away into the ground before it
can rise up and find its way through the window. This leads to another
issue: porosity or flaws in the wall itself.
If a foundation wall is totally watertight there is little problem with
letting water run down against it all the way to the perimeter drain. If the
wall has had adequate damp-proofing and/or the water drains quickly through
the soil, there is little to be concerned about. The problem is that many
foundations are have defects and hairline cracks which allow water
infiltration.
Sources of Leaks in Foundation Walls
Concrete block foundations often crack in the grout joint between blocks.
Even poured concrete or ICF walls can develop
shrinkage or settling cracks in addition to water channels from anchor bolts
and form ties.
Honeycombing due to improper vibration and consolidation is another
source of leakage, wherein the concrete aggregate became separated leaving
voids in the wall. In addition, poured walls often have seams between
different stages of the pour. Another problem exists with many of the older
foundations that are constructed of various sizes and shapes of cut granite
and round fieldstone. With or without mortar between, these foundations
typically exhibit numerous passages for water to follow. Water can enter
walls around utility penetrations such as sewer, water, gas or electrical
conduits.
There are several instances where I've been engaged to dig around
existing buildings and to waterproof walls and/or install drainage systems
only to discover that the actual problems were unrelated to groundwater.
Having been under the direction of an architect in some cases, I've had to
follow his recommendations rather than follow my instincts to determine the
problems.
Consider this example that involved an old house with a loose stone
foundation. The original work that was done under the direction of the
architect only aggravated the wet basement problem. Digging a shallow
perimeter drain actually allowed more water through the porous basement
wall. This was the same mistake many people make when they dig out next to
their foundation wall and replace the original backfill with crushed stone
either for appearance and splash protection. Putting crushed stone directly
over the original soil, even with the installation of a perforated drain
pipe often causes more water to enter the ground. The crushed stone becomes
a dispersion system in the same way it does in a septic drain field. Usually
little water enters the drain pipe, except in a deluge, and more water soaks
into the ground next to the foundation where it makes its way into the
basement.
What I did to solve the problem was to seal the outside of the wall with
a coating of concrete that directed surface water away from the foundation
as it soaked into the ground, keeping it from streaming through the loose
stone foundation. The addition of a bituminous asphalt coating or a
Bituthene membrane can also help to keep water from penetrating the
foundation wall.
The success with this project has prompted me to use this technique in
many other situations. Rather than using concrete, however, in most cases I
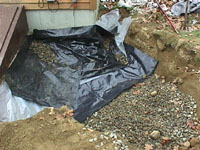
rely on a layer of rubber or plastic to direct water away from the wall.
Usually I excavate just a few inches below the surface next to the building
and three to four feet lower at a distance of four to five feet from the
wall, sloping the soil down on a 30 to 45 degree angle away from the
building as I go. I rake the earth smooth, remove all rocks and sticks, and
tamp it firm. Then I install a layer of rubber or a couple of layers of 6
mil polyethylene over the slope, right up to the wall. I don't usually worry
about sealing against the wall, as my primary concern is to direct the
majority of the surface water away from the wall and out into the earth
where it can soak harmlessly away, leaving a "dry zone" beneath the membrane
next to the wall.
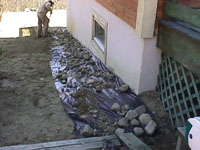
I use this same technique under a window well if there is any question
about the integrity of the wall below the window. I dig out a few extra
feet, slope the soil, install the plastic membrane on the slope, place
crushed stone as a mini drywell for any rainwater that may enter, install
the window well structure and then backfill to the surface as discussed.
This technique of installing a membrane just below the ground surface is
similar to installing "flashing" around a chimney or other structure on a
roof. One of its biggest benefits is that it can eliminate the need to
completely excavate a foundation wall all the way to the footing and
attempting to waterproof it. It is somewhat similar to installing a full
length "splash block" mentioned in other basement drainage articles on the
Internet except that it is out of sight.
I've also had success with this technique even when attempts to make the
wall watertight below have failed. One case in particular involved a local
public building with ninety year old granite block walls. Excavating them
completely, steam cleaning, re-mortaring the joints and sealing with some
hi-tech black goo did not keep out the water as well as this flashing system
that I installed just below the ground surface after the other waterproofing
had failed.
In some cases it may be wise to seal the plastic or rubber membrane to
the foundation wall -- particularly if there is an excess of water falling
from the roof and splashing against the wall. It is also helpful sometimes
to place crushed stone over the plastic and install a drain pipe in the
stone that runs to a surface outlet to provide water a way to exit without
ponding in the stone.
In short, anyone with a water problem in an area which doesn't usually
have poor soil conditions should closely examine their situation before
insisting on a course of action. It could be the problem may be solved for
very little cost, without the need for heavy equipment and the resulting
mess. There are few jobs more tedious for a contractor than diging around a
house without destroying the landscape, the underground utilities, or his
back.
Conventional waterproofing
There are times when it is possible to apply a waterproofing/ damproofing
coating or membrane to the entire wall such as when it is being completely
excavated to replace a perimeter drain. If there is any suspicion that the
wall is not watertight, this is the time to do something.
While a wall is uncovered I fix obvious cracks, seams, or leaks around
utility penetrations because it is far better to do this on the outside
rather than the inside of a wall. Such repairs call for cleaning out any
loose material and inserting either an expansive hydraulic cement or high
quality caulking designed for the purpose. Sometimes it is best to actually
widen a crack to get the best performance from the repair material. (There
are usually manufacturer's recommendations with these products.)
Because the conventional black tar that most contractors use is really
just damp-proofing, I often install a layer of 6 mil poly over it when it is
still slightly sticky. (This has other advantages to the installer working
in a narrow trench on uncertain footing!) I've also used the sticky backed
rubber membrane that's been used as a water shield under shingles on roofs
for many years. It bonds well to an old, well hardened asphalt coating that
has been cleaned well but doesn't like to stick to bare concrete or stay in
place over a fresh asphalt coating.
The effects of condensation can be as devastating to a home as water
leakage, causing rot, mold, mildew and generally disgusting and, possibly
unsafe conditions. (I have seen mushrooms growing inside on occasion). Since
so many local dwellings in remote areas are vacation homes, many are lived
in only a part of the time. This can mean inadequate ventilation (as houses
are closed up much of the time) which is often aggravated by
colder-than-normal internal temperatures. Many of these homes are only
heated to just above freezing during much of the winter, if at all. When
folks arrive for the summer, they open the house, letting in warm, humid air
that condenses its moisture against cool basement surfaces.
Perhaps the best solution for this is to have the house opened earlier in
the springtime, allowing the basement temperature to equalize. Air
conditioning can also help, but at least one basement drainage expert warns
that dehumidifiers may actually cause more damage to basements.
Sloppy Mortar
On one job I was required to dig up an entire wall only to find that
the problem occurred just a few inches below the surface of the ground. The
lower part of the foundation was poured concrete (in excellent condition)
with exposed granite slabs set on top to support a church. When the
morticians (the guys who put in the mortar) had filled the irregular spaces
between the granite and the poured concrete, they had let the mortar settle
away from the granite just slightly. This tiny gap allowed rainwater
to channel into the basement behind the finished interior wall that hid the
whole process from our view on the inside.
To make matters worse, the basement window wells were filling with
rainwater from the roof, so much so that it was coming in around the
windows. We constructed dry wells below the windows, easily relieving this
problem, while the leakage below the granite was stopped by sealing the
cracks with masonry and a layer of plastic.
Difficult Challenge
After digging up almost the entire perimeter of a house in a very
sandy soil, I came to the conclusion that it was a combination of events
that caused water to enter the basement each spring. A deck behind the house
was keeping the winter snow from insulating the ground underneath,
encouraging frost to penetrate the ground. Since the ground below the deck
had frozen, spring rains and melting snow could not to disperse harmlessly
away. Since the ground surface was sloping toward the house, water was
forced to run toward and alongside the foundation wall. To top it off, there
was a seam in the foundation which allowed water to leak into the basement.
Sealing this seam and sloping the grade away from the house eventually
solved the problem.
Test Pit
A hole dug to determine soil type, seasonal high water table, and
depth to ledge. Some states require a test pit of specific depth (to
determine that ledge is a minimum number of feet below bed bottom) while
others require only a shallow pit to determine depth to hardpan soils.
Conclusion
In conclusion, the keys to effectively addressing foundation
and basement moisture problem are:
Proper diagnosis -- assessing whether the source is surface or ground
water or warm, moist air condensing on cool surfaces, or a combination of
two or more of these sources;
Following accepted practices to keep water from entering through the
basement wall and/or lower the water table around the structure, and
Maintaining the drainage system to make sure that water goes where you
want it to!
Builders Websource® is a corporate
member of ASTM International—a non-profit engineering body dedicated in
part to the standardization of building materials specifications,
products, systems, and test methods for improved health, safety, and
reliability of residential and commercial structures.
 Many
"how-to" magazines run articles touting miracle products that stop water
from permeating through foundations or basement walls and floors. While some
products may be effective at mitigating water migration through cracks or
flaws in a wall, blocking groundwater can be as tough as keeping water from
leaking through split seams of a wooden boat. So long as any part of the
boat is in the water, a certain amount of water is bound to find its way
inside. Never wait until water enters the basement or permeates the
foundation before treating the root cause. The resulting dampness is both
distasteful and potentially dangerous, even if there is no noticeable
standing water.
Many
"how-to" magazines run articles touting miracle products that stop water
from permeating through foundations or basement walls and floors. While some
products may be effective at mitigating water migration through cracks or
flaws in a wall, blocking groundwater can be as tough as keeping water from
leaking through split seams of a wooden boat. So long as any part of the
boat is in the water, a certain amount of water is bound to find its way
inside. Never wait until water enters the basement or permeates the
foundation before treating the root cause. The resulting dampness is both
distasteful and potentially dangerous, even if there is no noticeable
standing water.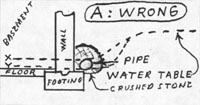 a common finding is drain pipes that were installed above the foundation
footing, which allows water to rise to the level of the floor (Figure A,
level Y).
a common finding is drain pipes that were installed above the foundation
footing, which allows water to rise to the level of the floor (Figure A,
level Y).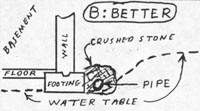 Conventional
perimeter drains are usually constructed as shown in Figure B with 4" pipe
laid at the base of the footing. Most contractors use 1 1/2" crushed stone
around the outside of PVC or thinwall perforated septic system pipe which
has 1/2" or 5/8" holes every few inches. Usually this is entirely
satisfactory, though in some cases capillary action (wicking) within the
soil can make the basement floor damp even though it is a few inches above
the artificially lowered water table.
Conventional
perimeter drains are usually constructed as shown in Figure B with 4" pipe
laid at the base of the footing. Most contractors use 1 1/2" crushed stone
around the outside of PVC or thinwall perforated septic system pipe which
has 1/2" or 5/8" holes every few inches. Usually this is entirely
satisfactory, though in some cases capillary action (wicking) within the
soil can make the basement floor damp even though it is a few inches above
the artificially lowered water table.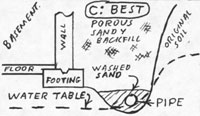 sitework
started, the property was deluged with rain. The rain aggravated an already
difficult groundwater situation, threatening postponement of construction.
However, with patience (and a good pair of rubber boots), perimeter drains
were installed four feet outside of where the house was to be located.
Within days of installing the drains, excavation for the basement was able
to proceed as if it were a dry summer.
sitework
started, the property was deluged with rain. The rain aggravated an already
difficult groundwater situation, threatening postponement of construction.
However, with patience (and a good pair of rubber boots), perimeter drains
were installed four feet outside of where the house was to be located.
Within days of installing the drains, excavation for the basement was able
to proceed as if it were a dry summer.
 in may simply be surface water entering over or through the foundation at
bulkheads or window openings, seams between walls, and/or, flaws in the
foundation. Poor surface grading can direct water toward the lip of a
bulkhead or towards basement windows where it can spill over into the
basement. By not paying attention during heavy rains, a homeowner can
sometimes end up blaming the wrong culprit.
in may simply be surface water entering over or through the foundation at
bulkheads or window openings, seams between walls, and/or, flaws in the
foundation. Poor surface grading can direct water toward the lip of a
bulkhead or towards basement windows where it can spill over into the
basement. By not paying attention during heavy rains, a homeowner can
sometimes end up blaming the wrong culprit.