|
 Now that you've put the final touches on the inside and outside of your
home, it's not too soon to think about your landscaping and hardscaping
plans. If you plan extensive modifications to your landscaping as part of
your remodeling or new construction project, it's best to do this up front
as part of your overall architectural plan. Some municipalities require
basic landscaping plans prior to granting a building permit. Others even
require the homeowner to post a bond, ensuring that sufficient funds
remain for exterior treatments. Now that you've put the final touches on the inside and outside of your
home, it's not too soon to think about your landscaping and hardscaping
plans. If you plan extensive modifications to your landscaping as part of
your remodeling or new construction project, it's best to do this up front
as part of your overall architectural plan. Some municipalities require
basic landscaping plans prior to granting a building permit. Others even
require the homeowner to post a bond, ensuring that sufficient funds
remain for exterior treatments.
Since landscaping and hardscaping add interest and beauty to your
property, never underestimate both the time and the costs involved in this
important finishing phase. For a modest fee (ranging from $1,000 on up),
you can hire a landscape designer to provide basic sketches and ideas that
complement your main architect's skills. An elite class of designers are
members of the Association of Professional Landscape Designers (APLD).
Alternatively, you can work online with Builders Websource to do the
design for you using an APLD-certified professional landscape designer. CLICK
HERE for more information about cost-effective online landscape design
services.
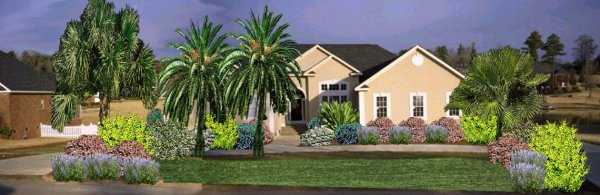 |
| Rendering courtesy Clearwater Landscape Design |
Landscape designers can help you plan the shape of plating areas,
decks, walkways, driveways and retaining walls in addition to recommending
a range of plants, trees and flowers that enhance your home's beauty and
fit with the style, climate and exposures of your property. Photorealistic
elevation views, such as the one above, show your landscape as it grows
from from infancy to maturity.
Planning in advance can save you thousands of dollars compared to
waiting. Certain heavy work, including excavating, trenching for drainage,
installation of footings for decks, walls, or planters, will be more
economical if included as part of other work. Furthermore, as your project
progresses, it may be harder to provide big machinery the required access
to tight side yards that might otherwise be easier to access before
construction gets underway.
Hardscapes
Hardscaping -- as the name suggests -- is the part of your landscaping
that is not living -- such as walls, walkways, driveways, decks and other
decorative areas. Since most hardscapes serve a specific function -- such
as a driveway or meandering path to the front door -- these are usually
designed first. That's because form follows function -- and it's important
to be sure that your property has sufficient and safe access to doors,
garages and sideyards. To provide interest and aesthetic appeal, a good
landscape designer or architect can provide a lot of creativity when it
comes to hardscaping.
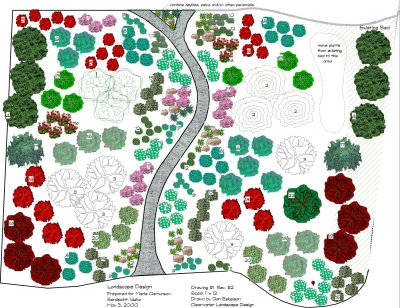 |
| Landscaping plan courtesy Clearwater Landscape Design |
For example, rather than run a sloped walkway straight from the street
to the front door, a more interesting approach might be to terrace the
walkway with a series of offset or staggered steps, about five or six feet
wide and six inches high. Rather than using plain cement, the steps could
have a border of brick, stone or tile, with a decorative aggregate finish
in the center. The aggregate finish not only provides a sure-footing on
wet surfaces, but it adds architectural interest that is balanced by the
contrasting clay brick border. Staggering the steps provides ample
opportunity to plant a living frame of shrubs and colorful flowers,
enhanced by a low-voltage lighting system that safely welcomes visitors to
your front door.
Delicate curves are a favorite of landscape architects because they
help break up the angularity and predictable pattern of typical homes.
Nothing looks more elegant or timeless than a curved driveway made of
cobblestones or interlocking pavers that blend beautifully into the
surrounding environment. What normally functions as a utilitarian
requirement of our modern automobile-dependent society suddenly becomes an
integral and pleasing piece of the overall landscaping theme.
When planning for walkways and driveways, ask yourself the following
questions:
- Which are the primary entrances?
- Is handicapped access required?
- What kind of slopes are there and how can they be used to the best
advantage?
- Is space required for turning or maneuvering vehicles prior to
backing into the street?
- Do you expect to have any large vehicles parked in the driveway,
such as a motorhome or boat?
- If you plan to park large vehicles on the premises, is there a way
to orient the driveway and surrounding trees so as to shield the
vehicle from open view? (There's nothing more unattractive or
disrespectful to a neighborhood than planting a 30-foot motor home on
the middle of your driveway in plain view as the leaves, dirt and bug
carcasses rot away from last summer's road trip)!
- Is the driveway wide enough to comfortably accommodate the number of
cars you plan to park in the garage?
- Are there large trees nearby that could uproot your hardscaping
causing expensive repairs down the line?
- If someone parks in the driveway, how do they get to the front door,
the side or rear door?
Hardscape Sub-surface Preparation
 Where concrete or brick work is to be performed, the importance of
proper sub-grade treatment can't be overemphasized. I've seen a lot of
expensive concrete work go in over years only to find shortly later that
the work has sunk half an inch or more due to improper preparation. As
with any foundation system, any loose or disturbed soil should be removed
or re-compacted prior to covering it with concrete. In some cases, several
inches -- or even several feet of soil may need removal if it had been
previously disturbed or dug up at one point during construction. Where concrete or brick work is to be performed, the importance of
proper sub-grade treatment can't be overemphasized. I've seen a lot of
expensive concrete work go in over years only to find shortly later that
the work has sunk half an inch or more due to improper preparation. As
with any foundation system, any loose or disturbed soil should be removed
or re-compacted prior to covering it with concrete. In some cases, several
inches -- or even several feet of soil may need removal if it had been
previously disturbed or dug up at one point during construction.
Compacting just the top won't help because compaction must usually
occur in thin layers -- a few inches at a time -- to ensure that the
entire base will not settle appreciably over time. Depending on the
weather conditions and freeze-thaw cycles, the depth of sub-grade
excavation may vary. If you live in an area where the soil doesn't freeze,
usually a minimum base of 4" of compacted base rock/aggregate is
recommended prior to pouring cement. If you live in an area exposed to
severe frost or highly expansive clay soils, sometimes several feet of
soil may require removal to avoid ground heaving that would later cause
substantial surface cracking.
Depending on where you live, the removal, hauling and disposal of soil
can be expensive. Be sure your contract states explicitly that the price
includes this portion of the job -- or else you're liable to end up with a
heap of dirt on your lot so big it will surprise you. As you're planning
your hardscape, you should also be thinking about your irrigation and
lighting system. Laying down a few strategically placed 2"-3"
diameter schedule 40 PVC chasteways under walkways and driveways will give
you ample opportunity later to run electrical conduit and water lines. The
chasteways not only buffer the actual pipes from slight settlement or
ground movement, but they provide a convenient tunnel for adding more
conduits or water lines at a future date. This obviates the need to tear
up the concrete, not to mention that it greatly simplifies future repairs
should a leak occur below the surface.
Other questions to consider are: where will rainwater drain? What about
irrigation runoff? Are there existing mature trees that could form the
focal point of a deck or sitting area? Are there any trees that may
require removal because of disease, rot or decay?
Walls and Fences
One of the finishing touches you may want to put on your home's
exterior landscape are walls or fences. Common materials include brick,
wood, wrought iron, cement blocks and stucco. Even insulating concrete
forms (ICFs) have been used to erect high walls along property lines.
Depending on the style of your home, one type of fence may be preferable
over the other.
If you can afford it, consider a masonry wall. Properly constructed, a
masonry wall will last a lifetime. It won't rot, it won't lean over
(assuming proper foundation design) -- and it will provide not only
lasting beauty but soundproofing and security as well. You only have to
visit historic cities such as Jerusalem or Rome to see masonry walls
hundreds or even thousands of years old.
The biggest problem I've noticed with masonry walls is the lack of a
proper foundation and steel reinforcement. Typical masonry walls weigh
approximately 150 pounds per cubic foot. That means an 8" wide, 6'
tall cement block wall weighs nearly 1,000 pounds per foot of length. Add
to that forces imparted by wind, earthquakes or shifting soil and it's
easy to see why some masonry walls have failed the test of time.
Depending on the soil conditions and freeze-thaw depth, probably the
most stable wall foundation you can specify is a pier and grade beam
foundation similar to those described in the chapter on FOUNDATIONS.
A typical footing detail, for example, might consist of a
10"x20" grade beam tied to 12" diameter piers spaced on 4'
- 6' centers drilled 8 - 10' deep. This system will not only help prevent
differential settlement, which can cause unsightly cracks in the wall, but
the deep piers make it virtually impossible for the wall to lean or tilt
over time. To carry the loads, the grade beams should be reinforced with 2
#5 bars at the top and bottom of the beam - tied with #4 stirrups every
10-12". The bottom bars prevent the grade beam from sagging between
supports -- which would otherwise result in severe tension cracks. The top
bars stabilize the grade beam and prevent cracking due to upward pressure
from swelling or frozen soils or earthquakes.
To provide additional lateral reinforcement, vertical rebar spaced at
16" on center tie the cement blocks to the foundation. The voids in
each CMU should be filled with soupy grout or cement in order to create a
unitized structure. Unreinforced walls are subject to failure during a
moderate to strong earthquake or windstorm. Horizontal bars are also
spaced typically at 16" on center. If the wall is to be a retaining
wall, the reinforcement should be engineered to withstand the expected
loads. Retaining walls often have #6 or larger rebars spaced at 8"
centers or less. In extreme cases, dual rows of rebar are required
within the CMUs. Be advised that the above specifications are only used as
an example. You should always consult a licensed structural engineer
based on your particular lot and soil conditions.
A variety of cap details are available to "finish off" the
look of the wall. For interest, sometimes the cap can be painted a
different color to provide contrast.
Redwood or cedar fences are popular due to their relatively low
installed cost (between $15 and $25 per foot including labor). A good
online source for Redwood fencing and decks is available at the CALIFORNIA
REDWOOD ASSOCIATION website. Since wood is subject to decay,
it's not uncommon to see wood fences leaning capriciously from side to
side -- like a serpentine -- because the posts fail to provide adequate
lateral support. For this reason, I recommend using pressure-treated 4x6
or 6x6 posts rather than the traditional 4x4 redwood posts. The heavier
posts not only provide stouter lateral support, but they open up the
opportunity to provide more pleasing fence designs that look good on both
sides (sometimes called a good neighbor fence).
This design is not only aesthetically pleasing but it ranks high on the
durability scale if properly installed. The 6x6 posts provide excellent
stability and resistance to rot. The 2x12 toekick provides lateral bracing
between the posts and doubles as a solid nailer for the 2x6 bottom plate.
It also allows for some variation in soil levels and can act as a small
retaining wall. Then 1x8 redwood boards are overlapped and staggered
vertically, yielding a design that appears the same on both sides of the
fence.
Furthermore, as the fence boards dry, the overlapped edges still
provide total privacy from side to side -- eliminating the visible gaps
that are typical of fences whose boards are simply butted together side by
side. 2x2 Redwood nails on each side of the boards are screwed into the
2x6 top and bottom rails. This secures the boards in place and makes for
easy replacement of damaged boards in the future. A top 2x6 rail,
typically 16' long, ties the entire fence together, giving it a nice
finishing touch and added strength.
Soil Preparation, Irrigation and Outdoor
Lighting
Once you've put in your hardscaping, walls and fences, you're ready to
prepare for the color and greenery that bring your yard to life. Assuming
you have a plan in mind, it's time to finish the grade and prep the soil.
If your soil is already rich and well amended, mixing in a little fresh
topsoil may be all you need to ensure healthy foliage. However, if your
soils is particularly sandy, heavy or overly acidic or basic, proper soil
preparation will be required prior to planting. If in doubt, contact your
nearest garden center for advice on improving your soil. If your soil is
heavy clay -- which is typical of many parts of North America, generally
mixing in some washed sand (no salt) and compost or nitrogenized top soil
will help to loosen up the clay and provide better drainage and air
permeability.
After rototilling in your amended soils to a depth of approximately
12", use a landscaping spreader to sculpture the grade, trying always
to slope away from the house towards the street. In areas where you expect
to plant lawn, use a water barrel to compact the soil to prevent future
settling.
At this point, you can start to layout any border elements to set off
planted areas from grass, for example. While redwood looks nice, it will
rot after 10 years or so, requiring replacement. An alternative is the use
of a plastic edge strip, which is easy to bend in a tight radius and is
impervious to decay. Newer composite materials, made from plastic and wood
by-products, provide attractive (if not slightly artificial looking) edge
details.
Taking your landscape plan, you're now ready to lay out your irrigation
and sprinkler system. Starting from the location of your sprinkler valves,
begin trenching a narrow ditch to accommodate all the individual sprinkler
"home runs" you expect to make. Unless your runs are
exceptionally long, using 3/4" schedule 40 PVC should suffice. Never
use 1/2" pipe except for risers. 1/2" pipe generally has too
much friction loss and often fails to deliver the required volume of water
needed in an area. While this book does not go into sprinkler design
practices, there are many good references on this subject, including
irrigation manufacturers websites such as TORO
and RAINBIRD.
Before covering up your sprinkler lines, always be sure to run a
pressure test and check for leaks. Finding a leak later, especially a slow
one, can be troublesome. In addition, there's another little trick that
will come handy some day down the road. Along each home run or major
sprinkler artery, run a piece of coated copper wire, such as #16 gauge
electrical wire all the way back to the sprinkler junction box. Then,
attach all these wires together where they all converge. In the future, if
you ever need to trace the location of your sprinklers, you can inject an
electronic tone onto the wire....and use a special homing device to
pinpoint the location of your sprinkler pipes. The cost of doing this is
minimal, yet you'll be glad you did it if you ever have to tap into your
sprinkler system again in the future for repairs or expansions.
During this same time, trench for any electrical conduit that may be
required for outdoor lighting, electric gates, or any other electric
device, such as outdoor speakers or security camera. If the conduit
is carrying high voltage (110VAC), it must be buried at least 18"
below grade according to the electrical code. No low voltage wires can
share the same conduit as a high voltage wire.
Once all your pipe and plastic conduits are in for water and electrical
service, you can cover them back up to prepare for planting. Use small
stakes or colored flags to mark the location of each sprinkler head. Using
a different color for each zone makes it easy to see which sprinklers are
associated with each zone.
Planting
 This is one of the most rewarding parts of remodeling. The sudden
infusion of color and greenery brings your whole project to life.
Generally, start first with any specimen trees (such as 24" box or
greater) that may require special equipment or heavy lifting. Follow
the nursery's guidelines for hole depth, width and fertilization. Then
follow with smaller trees, such as those in 5, 10 or 15-gallon containers.
Be sure to stake younger trees so they grow straight and aren't damaged
from heavy winds while the trunks are young. Don't over stake the tree,
however, otherwise the trunk may fail to develop sufficient strength over
time. Some movement is important for the tree's natural ability to develop
a strong trunk. After all the trees are in, you may want to move in any
additional ornamental objects, such as specimen rocks. This is one of the most rewarding parts of remodeling. The sudden
infusion of color and greenery brings your whole project to life.
Generally, start first with any specimen trees (such as 24" box or
greater) that may require special equipment or heavy lifting. Follow
the nursery's guidelines for hole depth, width and fertilization. Then
follow with smaller trees, such as those in 5, 10 or 15-gallon containers.
Be sure to stake younger trees so they grow straight and aren't damaged
from heavy winds while the trunks are young. Don't over stake the tree,
however, otherwise the trunk may fail to develop sufficient strength over
time. Some movement is important for the tree's natural ability to develop
a strong trunk. After all the trees are in, you may want to move in any
additional ornamental objects, such as specimen rocks.
Next, focus on shrubs, typically those found in 1-gallon, 5-gallon and
10-gallon containers. As with all trees, be sure to excavate sufficient
soil...and add in some starter fertilizer as you go. This will help to
ensure a strong root base early on. After installing trees and shrubs, be
sure to water thoroughly on a regular basis to help establish a healthy
root base.
Next, if you plan to add lawn, now is a good time to do it. Whether you
roll in sod or plant from seed, this is generally one of the last steps. A
good resource for planting lawn is the PACIFIC
SOD website as well as others in the BUILDERS
WEBSOURCE LANDSCAPING LINKS section. You can also finish off your
project with flowers, groundcover, river rocks, bark or shredded redwood,
called "gorilla hair." The mulch keeps the soil moist and
helps to minimize persistent weeds from growing.
Following these tips will help to ensure that your landscape is not an
afterthought, but rather, an integral part of your overall design theme.
Other details such as fountains, ponds and even small waterfalls can offer
a gracious surrounding that's your private respite from the hustle and
bustle of the outside world.
|